Wednesday, March 28, 2012

Egg-stra Special Easter Countdown

Since I haven't been creating very many egg-ceptional preschool activities lately, I had to ask myself what on earth I have been creating.  The answer is, I've been absorbed in making a countdown activity for Easter. I've seen a few variations out there on the web and I've wanted to make one for my own family. Therefore, I've been spending all my time finding the ideas I like the best and compiling, morphing and adding to them to make a grand total of 12 days of Christ-centered, meaningful, and fun activities to do every day from now 'til Easter.

Today was our first day, so I can't speak for the rest of the activities planned yet, but I was really happy with how it went so far. This is what we've got planned to do.

Materials:

  • 6 large plastic eggs (I wanted to use all large eggs to fit more stuff, but 12 large eggs won't fit in a carton)
  • 6 regular-sized plastic eggs (to off-set the large ones)
  • an egg carton
  • the stuff to go inside the eggs


    It's the stuff to go inside the eggs that makes this difficult. Difficult because a). it has to fit, and b). it has to relate to your activity and message.

    Day 1: lifesaver candies Review the Easter story. I used 14 of the pictures found in the LDS Gospel Art Kit depicting the last week of Jesus' life, starting with His triumphal entry and ending with the resurrected Lord. Talk about how the word "lifesaver" applies to the story.

    I got the next idea straight from this website: shauna-lynn.blogspot, and tweaked it just a little.
    Day 2: mini playdough Discuss the name of Jesus. Read the story of the angel coming to Mary in Luke 1.  Talk about what the name of Jesus - Immanuel, “God with us” - means.  Review the many names of the Savior. Play appropriate selections from Handel's "Messiah." Talk about the meaning of our own names. Have meanings of our names on slips of paper in bag. Take turns pulling out a meaning and guessing who's name it defines. Use the playdoh to spell out the name(s) of Jesus.


    Day 3: bells Sing an Easter song. Choose an Easter related song from the LDS Children's Songbook to learn. I chose "Hosanna" because it seems the easiest. I made plastic eggs into shakers with bells inside for the kids to accompany us as we learn and sing the song. Have the kids come up with hand/body actions to help learn the words. 


    Also directly from shauna-lynn.blogspot.
    Day 4: 2 Swedish Fish & 5 crackers Learn the story of Jesus feeding the 5000. Try to break the bread and fish. How many times can we do it? Read the story in Matthew 14, Luke 9, or John 6. Talk about how everyone go enough to be full and not just tiny pieces. 


    This idea came from a book I have titled: A Christ-Centered Easter, Day-by-Day Activities to Celebrate Easter Week by Janet and Joe Hales.
    Day 5: leaves Celebrate Palm Sunday with a play. Janet and Joe Hales call it the "Triumphal Entry Play" and suggest a cast including narrator, disciple(s) sent in search, Christ, donkey, donkey's owner, disciples shouting "Hosanna." Events unfold as follows:
    1. Disciples are sent in search of donkey (Mark 11:1-3).
    2. Disciples find donkey and owners (Mark 11:4).
    3. Owners question disciple' intentions (Mark 11:5-6).
    4. Clothing is draped on donkey; Jesus sits upon it and rides into Jerusalem (Mark 11:7).
    5. Many disciples cut down palm branches and shout "Hosanna" while waving the branches and spreading them and clothing in the path of the donkey (Mark 11:8-10).
    Don't forget props and costumes.


    From shauna-lynn.blogspot.
    Day 6: toy boats Experiment to accompany the story of Jesus calming the storm. Read the story in Matthew 8, Mark 4, or Luke 8 and discuss. Make a storm in a bottle with a toy boat for each child. Recipe found here: Recipe for Storm in a Bottle. Have the kids try to calm their storms instantly (obviously, it can't be done). Discuss.
    *note: we just did this one last night and it was a pretty big flop, in my opinion. the "storm in a bottle" idea is pretty lame and not very dramatic. which, consequently, makes it difficult to discuss. we even tried a couple of different recipes. next year we'll be making storms in the bathtub instead.


    Adapted from shauna-lynn.blogspot.
    Day 7: fun bandaids What does it mean to be healed? Read the story of Jesus healing the blind man in John 9. Blindfold the kids and lead them in a few activities with it on. Discuss what it would be like to be blind and then be healed by Jesus. Let the kids tell of a story when they got hurt and place bandaids on their bodies. Talk about how Jesus could heal these hurts too. Lead kids into discussion of other kinds of hurts, emotional, spiritual, etc. and discuss how Jesus heals these wounds as well. 


    From shauna-lynn.blogspot. (p.s. I love this one that she came up with so I'm pretty much just copying it word for word.)
    Day 8: time coupons rolled up (1 per kid for me, and 1 per kid for my husband) Read the story of how Jesus loved the children in Mark 10. Talk about adults in our lives that obviously love children. How do you know and what do they do to show it? How do we think Jesus showed it? How would you like me to show you that I love you and value spending time with you? Fill out the coupons together and let the kids keep them to redeem as they wish.


    Day 9: clue to find Smarties and Nerds Learn the parable of the 10 virgins. Before opening the egg for today, have the kids help trim and fill an oil lamp and explain how it works (we happen to have one from Jerusalem that my mother gave us), turn off all the lights in the house and proceed to the activity using only the light from the lamp (and maybe a few other candles). Open egg and follow clue to the candy. Read the parable of the 10 virgins in Matthew 25 and discuss with reference to who was a Smartie, and who was a Nerd. Eat candies as we talk about what happens in the story and what it means to us. 


    Day 10: piece of pita, Hershey kiss, piece of silver money, piece of soap, sour candy, pretzel Use symbols to learn about Jesus' last day as a free man. Read selections from the events of this day in Matthew 26, Mark 14, Luke 22 or John 13-18. Talk about the main things that are happening: Judas conspiring to betray Christ for 30 pieces of silver, the last supper, Jesus washing the apostles feet, Jesus was sad and asked his friends to watch/tarry with him, Jesus praying in Gethsemane, and the betrayal. After we learn the story, have the kids try to sequence it correctly using the symbols as helps. It should look like this: money (30 pieces of silver), pita (last supper), soap (washing feet), sour candy (sadness of Jesus), pretzel (prayer-like two folded arms), kiss (Judas' betrayal). 


    This one is, again, from the book by the Hales, A Christ-Centered Easter.
    Day 11: pecans Review the story of Jesus' crucifixion while making cookies before bed. I found this recipe and activity in the book, but I have also seen it on the web, so I'll just post a link: Easter Story Cookies. It looks like a great activity!


    Day 12: empty Today is Easter--celebrate the resurrection of our Savior! Eat the cookies from yesterday's activity-discuss how they are hollow. Both the empty egg and the hollow cookies are wonderful symbols of the empty tomb. Go on to celebrate with our usual Easter activities. 


    That's what I've got. Hopefully each day will be a positive experience and serve to focus our family on our Savior and His Atonement. 

    Friday, March 23, 2012

    A Week Off

    After St. Patty's I was feeling a little bit burnt out and I just wanted a break. Plus, it was really nice weather. So all this past week the kids and I have been playing outside and foregoing our usual schedule, including our preschool activities.
    One day we played hide and seek.  That's like a preschool activity. 

    Another day we went to our local museum. That's also like a preschool activity. 

    But other than that, we've just been hangin' out. Sometimes that just what we need.


    Saturday, March 17, 2012

    Rainbow Hunt

    This is kind of a Part 2 to yesterday's post. Whereas yesterday was mostly all about dad working with the kids, today's activity was more my contribution.

    About a week prior I had found a scavenger hunt sort of idea on The Crafting Chicks, that I really liked. So I printed out the shamrocks and laminated them and came up with clues of my own (written in an Irish accent, of course).

    On Friday night, after the kids went to bed, we sprung all the traps, took the gold, and left this shamrock to start off the fun.

    The Crafting Chicks have very graciously provided shamrocks in all the colors of the rainbow for your printing convenience, so it was super easy to put this activity together. At the end of the hunt (the purple shamrock) the kids found a pot of golden candies to share. I would have liked to make a more elaborate "treasure" for the kids to find, but time and budget didn't allow. Thankfully, my kids are always pretty excited about candy :-)

    We had a lot of fun starting out our day this way. But I have to admit that the traps were WAY more exciting to the kids than the rainbow hunt. It's true that they enjoyed the hunt, but all they were really interested in was how those dang leprechauns got away. And why didn't our traps hold them? And, they must be a lot smarter than we thought. And, NEXT year we are going to build WAY stronger traps that they can't get out of.

    Apparently, parental cheating of the experiment isn't the best idea. Eventually I had to break it to them. The truth about the leprechauns--and daddy's and my deception. They were good sports. They laughed. Then they started on their plans to make the trickiest leprechaun trap EVER.

    Friday, March 16, 2012

    Leprechaun Traps

    Oh how I wish I would have taken a picture of the leprechaun traps we made. But sometimes you just get excited about what you're doing and you forget to take a picture. Ah well.

    The fact is, though, that we did make leprechaun traps this evening (we wanted Daddy to get in on the fun) and it really was hilariously fun! As we've been talking about Ireland, leprechauns, rainbows, pots'o'gold, and all that good stuff this month, my kiddos have been unsure as to the reality of leprechauns. I keep telling them they aren't real and it's just a story, but they seem to hold onto this secret hope that maybe the little people really do exist. So I told them we would do an experiment to figure it out. I didn't think the idea would take hold as it did, but they were SO excited...as in jumping up and down, couldn't wait for daddy to get home, asking me every 2 minutes how many more minutes until it was time, EXCITED.

    I had called my husband at work earlier in the day to let him know what to expect when he walked in the door, so, thankfully, that good man came home prepared. I had also prepped him for the fact that I wanted the boys to come up with their own ideas for how the traps should work--because them thinking about the cause and effects of it all was kind of the purpose of the whole thing.

    So the hubby grabs a box and starts out with, "how are we going to use this box to catch a leprechaun, huh?" Which I thought was the perfect lead-in question to get them thinking. Our younger son was mostly just along for the ride, happy to help construct whatever creation the others thought of. But my older son's brain-wheels were working in overdrive. He was adamant the trap be some sort of device where the box fell down from the ceiling. This is where husbands with a science background come in handy. Before you knew it, I got to sit on the sidelines and watch contentedly as father and sons delved into a discussion about levers and pulley systems and tripwires and other things that I'm really not that interested in.

    About an hour later, we had two working traps in our home, one that even fell down from the ceiling when the leprechaun grabbed the gold. We set the traps with gold and told the kids that the traps were an experiment. If the leprechauns were real then one would get caught in our traps, if not...then...not.

    You've never seen kids so excited to go to bed in your lives. Or kids so excited to wake up in the morning. At 6am I awoke to my oldest son's face, two inches away from mine, loudly whispering about the state of the traps which he had taken the liberty of checking. Twice.

    Thursday, March 15, 2012

    Musical Shamrocks

    This may, quite possibly, be my most favorite activity that we've done, to date.

    I saw the idea when I was researching Valentine's day activities on No Time For Flashcards. I loved the game but wanted to use it for St. Patty's, so I just substituted shamrock shapes for the hearts that she used.

    Here's the gist of it. You put cut-outs of shapes, like a heart or shamrock or anything else you want, on the floor in a circle. Each shape has an action, movement, or direction on it. The kids take their places on the shapes and walk around while music plays. When the music stops, they stop and perform the action on whatever shape they happen to be standing on. It's like musical chairs, sort of, and a cake walk, sort of. Mostly it's just really fun.

    We had a ball with this one! We played for about an hour. Then we played for about another hour when daddy got home because the kids were so excited to introduce him to the game too :-) Love it!

    You can be creative and use whatever actions you want for the shapes. Here's what I came up with:


    And here are some tips from what my kids liked the best:
    • they liked singing the music themselves, and whenever it was their turn to sing the song while we circled around they were ecstatic because it meant they got to stop themselves on their favorite thing to do, which was always (for both of them) the "10 punches" station.
    • it was a good activity to help teach numbers as completing the directions usually meant having to repeat some action a certain number of times, great reinforcement. 
    • they were really happy about the pictures on the shamrocks and loved trying to guess or remember what they were supposed to do by looking at the pictures. 
    • they appreciated taking turns to complete the action when the music stopped. We tried doing all of our actions all at the same, but the kids really enjoyed "performing" and having the rest of us watch while they did whatever they were supposed to. I liked it better that way too because it gave us an opportunity to do funny things that we would all laugh at together. For example, every time I got on "head, shoulders, knees and toes" I would purposefully get one of them wrong. The kids loved to catch me at it and would laugh uproariously at the mix-up. Pretty soon they started mixing things up too which led to even more laughs. Fun stuff.
    It's a good activity. I like these ones that get us moving and learning and laughing all at the same time.

    Wednesday, March 14, 2012

    Gold Hunt

    I'm on a kick where I've been doing a lot of things that I find on the No Time For Flashcards website. Today is no exception. I really like the ideas on that site. I've found a lot of websites out there that have really beautiful ideas, or really creative ideas, or really elaborate ideas, or ones that require me to buy their really awesome ideas. I'm not as big of a fan of those ones. I like really practical ideas, and I guess what I really mean is "basic" rather than practical, because what does practical really mean anyway?

    ANYWAY. A successful candidate for an idea we try out will usually fall into this category: exceedingly cheap, easy to pull together within 5-15 minutes of prep, something that looks like it will capture the attention of my boys. They like boy stuff, they like to move, they like experimenting. They would probably like explosions and fire, but we try not to do that stuff too much :-)

    So the point of all of this IS...that...I find that the author of No Time For Flashcards comes up with a lot of ideas that are right up my alley. And I'm happy about that.

    Now, without further ado, I will tell you of what we did today. It's simple. I took a sheet of green construction paper and ripped it (literally) in half. I traced 10 circles onto the paper and drew a picture of a leprechaun who wants his gold back. Then I hid 10 pieces of those gold coin candies that you can buy from the store (actually I hid 20 pieces; 10 per kid). The kids had to go on a hunt to find the gold and then match them up to their papers. This is all directly from the Flashcard website.

    The only thing I did differently from the source was to make different sizes of circles on my paper. Because I had different sizes of gold coins, and I wanted to challenge my kids a little more, and I thought they could handle it.

    It was pretty fun. The kids enjoyed finding the gold, and then they enjoyed hiding the gold, and then they enjoyed eating the gold. Nice.

    Tuesday, March 13, 2012

    Lucky Books

    I'm sorry to report that my second book-making attempt did not go as hot as the first. The first books we made were so cute and so enjoyable that I figured I couldn't go wrong in making a book with the kids. But, I was wrong. There must be elements to successful book-making with kids that I didn't comply with. I have been trying to figure out what these elements must be. Here's what I've decided thus far:
    the subject of the book must be something the kids are interested in.

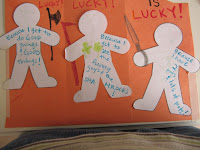
    I'm pretty sure that's where my attempt today failed. You see, I thought it would be so adorable to make books that chronicled why each of us felt to be a lucky person. I gave the kids a few brilliant examples like: "Mama is SO lucky because she has 3 amazing little boys to love!"and "Mama feels lucky to have been able to go to college" and "Mama is lucky to have a husband who works so hard so she can stay home and do fun stuff with her kids" and I drew some really awesome illustrations to accompany these statements (please read that with a heavy amount of sarcasm as my talent for art is at a bare minimum, if not completely non-existant). 

    Although my example of a book was gorgeous (don't forget the sarcasm), the kids turned up their noses at it, if you can imagine. I tried, with many words, to get them excited, but they would not be swayed. So I coerced them with much bribery to make a "Lucky Book" of their own. Unfortunately, the kids had related the word "lucky" as synonymous with "grateful for" and couldn't really ever get past it. Besides that, they were both stuck on I'm-not-taking-this-seriously mode resulting in "lucky books" that read something like this: "X is lucky because I get to do good things and more good things" and "because I have 2 pots and also lots of pots!" Thanks for that. 

    Oh well. I tried.


    P.S. don't mind the weaponry--my kids have recently discovered Lego's Ninjago TV series and toys and are, for the lack of a better word, obsessed. 

    Thursday, March 8, 2012

    Pot'o'Gold

    Our goal today was to repurpose the pots we used for Valentine's Day into St. Patty's Day pots'o'gold. My younger son was completely uninterested, he's going through a phase like that, so in the end we had only one pot'o'gold. But it's all good.

    All we did was paint over the pink, red and purple from last month, with black, black and more black. When we were done, we let it dry for a couple of hours. Acrylic paint dries pretty fast; one of the perks of using that kind of paint. My older son was insistent that I not help him in ANY way, so if there remain a few splotches of pot that are not black, that's just how we roll. Seriously, I'm way proud of him for putting this together almost entirely solo.

    After our black pot was dry it was time to fill it up with the gold! We used Rolos and gold coin candies-- mixed them all up until our pot was overflowing with golden goodness. To top off our pot'o'gold we needed a rainbow, of course. We tried putting all the pipe-cleaner rainbows we made yesterday in various positions around, in, and over the pot, but the kids liked the arch one the best. Voila! A pot'o'gold to take it's place of honor in the middle of our table. Way adorable!

    Wednesday, March 7, 2012

    Pipe-cleaner Rainbows

    I was running on empty today. Sometimes I get burned out of having to think of something for us to do. MOST of the time I throw an idea together that takes next to no prep and requires only stuff I currently have in my home. Every once in awhile I get good and plan a week or so of well-thought-out activities, and include what I need in my shopping list. But like I said, MOST of that time we fly by the seat of our pants. This was definitely one of those days.

    This is how it went down today. My youngest son comes up to me and says, "Mom, what are we doing today for our preschool activity?"
    And I reply, "Hmmm...what are we doing? You know, let me think about it while I do the dishes and then we'll do something really cool."
    To which he replies, "Something COOL?!  Grrrrrrrreat!"

    Then I'm stuck trying to think of something c-o-o-l.

    Well, cool or not, probably not so much but oh well, this is what I came up with while I finished the dishes.


    We've got a lot of pipe-cleaners. I figured we probably had some in each color of the rainbow so I told the kids we were going to figure out the best way to fashion a rainbow out of pipe-cleaners. Little did I know that kids don't automatically know which colors go in a rainbow or what order they go in. It's amazing what little pieces of knowledge we take for granted.

    So we talked for awhile about what colors are included in the rainbow. Then I let them pick out one pipe-cleaner in each color. I did, in fact, have pipe-cleaners in all the colors; for some, I even had a few different shades to chose from. After that, I let them try and make a rainbow on their own. They had a lot of great ideas! It was fun to watch the wheels turn in their little heads. One son suggested that we needed something to wrap the colors around, so we tried wrapping the colors around a core of other pipe-cleaners. Then we tried wrapping them around a craft stick. Both ideas were fun and gave us a lot of practice using all our finger muscles--dexterity and all that. Wrapping pipe-cleaners actually isn't all that intuitive. Another son put all the colors in this hands and bent them like a rainbow and commented that we just needed something to hold them all together. So we used white pipe-cleaners at the base of each side, wrapping them around and around to look just like little clouds. That one looks the most like a real rainbow, but all three methods were excellent sources for solidifying the colors of the rainbow and their order in one's mind.

    When we were done I asked the kids if they had had fun, and if it was a "cool" activity. My oldest said, "Yes, it was pretty cool. But usually you should have a treat for preschool activities. That makes them the coolest."
    "Yeah. That's the coolest, mom. The coolest!" added my younger son.

    Thanks kids. So, I've had my review for the day, and I know what I need to work on.
    Cool = treats.
    Got it.

    Tuesday, March 6, 2012

    Floor Hockey

    I think of any activity that requires the express and direct usage of my floor as an opportunity to clean it well. When the truth is that I don't honestly get around to cleaning my floor very thoroughly often enough, then I'm actually kind of excited about something that forces me to accomplish the task.

    Floor hockey is an activity that requires the express and direct usage of my floor, so I was, in fact, excited to be forced to clean my floor.

    After the floor was cleaned and the furniture moved out of the way, I took a look at my inspiration online: no time for flashcards.com, which is an excellent resource for all kinds of preschool inspiration. I was first attracted to this idea primarily because my sons have and wear the same pjs as the author's son in the video that she posted. CUTE! Also, I love sporty activities, so we decided to give it a go.

    The author suggested using left-over paper towel rolls as hockey sticks, so that's what we did. I fashioned two hockey sticks and two goals out of painter's tape and paper towel rolls like so:

     We also found a really soft, lightweight little ball to use as a puck.

    From here on out, we had to deviate slightly from the flashcard website because we had three people playing as opposed to only two, but the general ideas are all the same. Basically, we used our hockey sticks to try and score in each other's goals.

    Some items of note:

    • I had to continually remind the kids not to use their hands.
    • The kids loved having a turn to try out different roles: goalie or "hitter" as we termed it.
    • Eventually our paper towel rolls died, so we substituted them for wooden spoons which worked even better.
    • When daddy came home we got to play on teams and have a big hockey tournament--obviously, the MOST fun of all!
    • My kids spent ALL day playing hockey after I introduced them to it. 
    • They enjoyed practicing their aim by taking turns at free shots into the goal :-)
    My favorite thing about this activity, besides getting my floor clean, was having such a prime opportunity to talk about and practice good sportsmanship--a much needed lesson in this household.

    Monday, March 5, 2012

    Rainbow Grahams

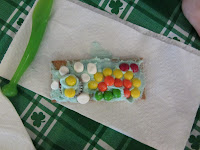
    I like candy. It's a fact. My kids like candy. That's a double fact. So sometimes we do preschool activities involving candy 'cause we like it so much. Today, we created St. Patty's inspired candy mosaics on graham crackers. Like this:


    I put all the candy out on the table and told the kids (and a friend) to make a rainbow, clouds and a pot of gold. It was super fun to see what they came up with all on their own. Some children are obvious abstracts or realists right from the start :-) One child is an obvious builder and worked for quite some time
    to get the pot so it looked like gold was inside it, and it inside the clouds. Way cute stuff!

    Here's what we used:

    • frosting colored blue (for the sky background)
    • skittles (rainbow colors)
    • mini marshmallows (clouds)
    • mini reese's peanut butter cups (for the pots of gold)
    I let the kids frost the graham crackers with the blue frosting, or "finger paint" it on if they were less than adept with the knife. 

    At the end, they each had a beautiful candy creation and a lucky treat to eat! 

    Friday, March 2, 2012

    Shamrock Pins

    I'm always looking for lightweight items my kids can make and send in the mail to their aging great-grandparents (or other family members who we don't get to see very often). I think of it as a good opportunity for my children to remember who my grandparents are and take a few minutes to do some "service" for them. We usually make cards too; I try to write down exactly the words that my children want to say on the cards, so the communication will feel more real for them. I wouldn't say that they love, love, love the whole process, but I would say that they enjoy it pretty well and I enjoy knowing that we've taken some time to try and brighten other people's lives.

    This time, in lieu of March, I had found a pin-making kit at the craft store that enabled us to easily create shamrock pins for St. Patty's day. Relatively flat, lightweight, decently small--perfect for postal sending. So we brought 'em home and got to work. I highly recommend a glance around the $1 section, clearance section, or bargain section at the craft store, or a "dollar store" has some pretty great buys for this type of item. My kids always enjoy these little kits and they amount to very little prep time for me since all the materials are already put together. Plus, I find that the amount of time necessary to complete the little packet or kit is usually equal to the amount of attention span my kids are capable of, so it's a good fit. Sometimes we get a necklace kit, or a beading kit, or a shrinky-dink kit, or those little deals where you put in the little salty stuff and then bake it to look like stained glass...etc. You know what I'm talking about. Anyway, in my opinion, the best part is that the kits really are CHEAP, so you don't feel bad throwing away whatever you've made after a few weeks (or however long your kids stay interested in the item), which means less crap to pile up around my house.

    Sendable, cheap, quick, no prep, fun, lots of variety, and tossable--all qualities that I can be excited about!

    Thursday, March 1, 2012

    Lucky Pennies

    We started off March, the month of St. Patty's Day, leprechauns, green, pots o'gold, rainbows, shamrocks and the like, with an experiment to make some lucky pennies.

    A friend of mine had done this experiment with her own child, and had referenced me to the book from which she found the activity. It is called, Everything Kids' Science Experiments Book, and you can check out a few of the pages if you click on the link. Anyway, it was one of the more successful science experiments that we've attempted so it gets a good rating from me.

    It's called, "Cleaning Pennies," and it's very simple. All you do is dump dirty pennies into a mixture of vinegar and salt. After a few minutes the dirty pennies will be much cleaner and shinier.

    If you rinse the pennies under the tap they will remain bright and shiny. If you pull the pennies out of the solution and leave them to dry without rinsing them, they will turn greenish, bluish, grayish. The only hard part about the experiment is that you have to wait quite a while for the greenish color to develop. For our pennies to really get a good coating of green/blue/gray it took a few hours. On the other hand, the cleaning process is really very quick and will yield excellent results in a matter of minutes.


    Before performing the experiment, I remembered I had seen something similar in one of my favorite blogs, Mom to 2 Posh Lil' Divas , so I checked it out really quick just to make sure the two sources agreed. I'm glad I did because I thought the Posh Diva site added a couple of great extension activities to the experiment that really made a difference for us. For example, the author added two additional solutions to test: pure water and a soap/water mix. Then her girls put pennies in all 3 cups and compared the results. So when we did our experiment, we did the same thing:
    (L to R: water, soapy water, vinegar/salt)

    It was interesting to get the boys' predictions and test them against the results. Of course, the vinegar solution wins the contest, but having the other two solutions gave me a chance to talk to the boys about various cleaning agents and how they work.

    Now all we have to do is decide which is more lucky: a shiny penny, or a green penny?